
Your shopping cart is empty!
Playing the Native American Style Flute Second Lesson Making Your First Sounds
Playing the Native American Style Flute
Second Lesson Making Your First Sounds
Just Blow and Make a Sound
In this second lesson on how to play the Native American style flute, we begin by creating your very first sound.
Place your lips gently against the mouth end of the flute. You do not need to place the flute inside your mouth. Simply press it softly against your lips, almost like a kiss. Now blow gently into the flute. Do not cover any of the tone holes yet.
Does it make a sound?
If the tone is high pitched and unpleasant, you are likely blowing too hard. This is called over blowing. When you over blow, the flute jumps to a higher octave. Try again with a softer, steadier breath. You should hear a smooth and clear tone.
Now you know the flute works and that you can make it sing.
Experiment with breath pressure. Blow slightly harder, then softer. Find a breath that feels relaxed and produces a full, clear sound with comfortable volume.
Covering the Tone Holes
Now place the pads of your fingers over the six tone holes on the barrel of the flute. Do not use your fingertips. Instead, use the soft fleshy area just below your fingernails.
The ring, middle, and index finger of your right hand cover the three lower holes. The ring, middle, and index finger of your left hand cover the three upper holes. Your fingers should rest over the holes without pressing hard.
When all six holes are covered, blow gently into the flute. You should hear a sustained, mellow tone. Your ear will quickly recognize when the sound is clear.
If the tone sounds weak or unstable, there are two likely causes. Either you are blowing too hard, or one or more holes are not fully covered.
Blow again with a softer breath. If that does not solve it, check your fingers. Air may be leaking beneath one of them. Do not press harder. Instead, gently shift your fingers until each hole is fully sealed.
It can help to look at your hands in a mirror to see how your fingers rest over the holes. Continue adjusting until you hear a steady and pleasing tone.
This sound is the fundamental note of the flute. It is also called the key of the flute.
Becoming Comfortable With the Fundamental Note
Spend a little time playing this note. Use gentle pulses of breath from your diaphragm or solar plexus rather than shallow breath from the mouth. Try short bursts of air, then long slow tones.
Lift all your fingers and then cover the holes again. Notice how it feels when your fingers rest naturally in place. At first it may feel awkward. Soon it will become second nature.
How to Play the Pentatonic Scale
Now let us introduce a second note.
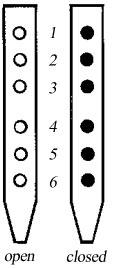
While blowing gently with all holes closed, lift the ring finger of your right hand from the lowest hole. This is hole number one. As you lift the finger, the pitch will rise.
Lower the finger again and return to the fundamental. Practice moving between these two notes until the motion feels smooth.
Now add a third note. With the ring finger already lifted, raise the middle finger of your right hand. Continue blowing steadily as you lift and lower the finger.
You now have three notes.
Remember that you do not lift a finger until the one below it is already lifted. The motion is sequential and flowing.
Next, we move to the left hand. On a six hole Native American style flute, keep the left ring finger down. Lift the middle finger of your left hand to add the fourth note. Then lift the left index finger to add the fifth note.
You have now completed a five note sequence known as the minor pentatonic scale.
Finally, lift the left index finger while continuing your steady breath. This note brings you back to the fundamental, but one octave higher.
Do not worry about musical terminology. You are already making music. The words are only labels.
Now allow your fingers to move up and down naturally. Change the speed. Vary your breath. Explore. Play. Discover.
Playing the Native American Style Flute Third Lesson Incorporating the Sound Ta
Now that you are comfortable with finger placement and can move through the minor pentatonic scale, it is time to add articulation to your playing.
A Simple Tonguing Technique
We introduce a gentle tonguing technique using the sound ta.
Without the flute, softly say ta several times. Notice how your tongue touches the roof of your mouth and releases.
Now apply that same motion while blowing into the flute. The ta sound creates what musicians call an attack, which is the beginning of a note. It helps separate notes and gives clarity to your playing.
The key is to blend this articulation with a steady breath so the music continues to flow.
With practice, you will no longer think about the motion. It will become intuitive and expressive.
Understanding Wet Out
Why Your Flute Sound Suddenly Changes
As you begin playing more often, you may notice that the flute starts clear and warm but gradually becomes airy or unstable. Notes may refuse to speak clearly.
This common experience is known as wet out.
What Is Wet Out
Wet out occurs when moisture from your breath builds up inside the flute. Warm air from your lungs meets the cooler interior of the flute and condensation forms.
This moisture collects in the slow air chamber and may travel toward the flue, the channel that directs air toward the sound edge. When moisture accumulates in the flue, it disrupts airflow and affects tone.
The result may sound breathy or uneven.
Why Beginners Notice It More
New players often assume they are doing something wrong. In reality, the flute is responding to moisture, not poor technique.
Wet out commonly occurs after ten to fifteen minutes of playing, especially in cooler environments.
What To Do When Wet Out Happens
When the sound begins to change due to moisture, the solution is simple but necessary. Stop playing and carefully remove the bird from the top of the flute. Gently wipe away any visible moisture from the flue and sound area, and blow lightly through the flute to clear any remaining condensation. Once dry, replace the bird securely and resume playing.
Trying to play through wet out rarely works and often leads to frustration. A brief pause to clear moisture will restore the flute’s natural voice.
A Natural Part of Playing
Wet out is not a flaw. It is part of playing a wooden wind instrument. Some players experience it more than others depending on climate and breath moisture.
Understanding wet out removes frustration and builds confidence.
For more information on how we reduce wet out in our instruments, visit our Wet Out Protection article.