Making an Ancient Territories Native American Style Flute:
A Step-By-Step Description
 After I have carefully selected my flute wood at a lumber dealer and trucked it back to the shop the first thing I do is cross cut the boards with a chop saw into various flute lengths – 21”, 22”, 23” etc. to make the different key Love flutes . I cut out any of the wood that has flaws like knots, cracks or unsightly blemishes. The length of the pieces varies depending on the key of the flute I am making. The lower the key the longer the Native American style flute and the longer the pieces of wood.
- Because boards from different mills have different thickness I must run all the pieces through a thickness planer so that they are of equal thickness.
- Then, I take these pieces and rip cut them on the table saw to the rough width – 1 5/8”, 1 1/2” etc. depending on the bore diameter of the Love flutes I will be making. Cutting two adjacent slices out of a board makes the right and left sides of the flute. When you do this the resulting two pieces can be 'book matched' so that when the two halves are glued back together the grain patterns of the wood form a near mirror image down the center of the top of the Native American flute.
- I now carefully label these book-matched pieces of wood. I must do this so that they don’t get mixed up as the process progresses and peices get shifter around.
- The next step is to flatten the bore side of the pieces of wood (if necessary) on a jointer so that the two sides of the flute will go together accurately and will make a tight glue joint.
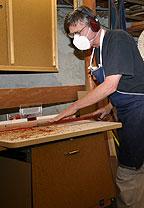 Next, the bore and slow air chamber of the Love flute are hollowed out on a router table. To do this I use a half round bit. This type of router bit is also called a cove bit. Routing out the semi circle groove requires three passes over the router. You take off a small portion of wood with one pass then raise the bit a little and take off more wood with the second pass. For very hard wood I may have to make more passes over the bit to progressively deepen the half round cut. Remember that the Ancient Territories Love flute is made in two halves. These two halves are glued together to make the single hollow tube that will become the flute. The large routed groove does not go entirely through to the mouth end of the flute.
- Now I must flatten the piece of wood to take out any warping that has resulted from routing the bore. This is done on a machine called the jointer.
- I sand the jointed surface on the belt sander to give the wood some tooth for the glue to adhere to. This removes a small amount of wood from the flute so I must go back to the router for a final pass to get the exact dimension of the depth of the cut. It must be an exact half circle.
- The slow air chamber at the mouth end of the Love flute is tapered near the mouth end of the flute by routing first with a 5/8 inch bit. This cut is about 2 inches long. Then I change to a 3/8 inch bit to make the entry or blow hole where the air enters the Native American flute.
 At this point I make the plugs that will separate the bore of the flute from the slow air chamber. The plugs are cut from hardwood birch dowels. The bore end of the plug is cross cut at ninety degrees and the slow air chamber exit end is cut at a 52-degree angle. This angled end of the plug is called the ramp and guides the air up and out of the SAC. This cross cutting is done on the chop saw.
- After the plugs are cut to size I sand off any rough edges left by the saw cut. Then I soak the flute plugs in polyurethane for a few hours. They will absorb the poly deep into the wood fibers. This makes the plugs resistant to absorbing moisture from the slow air chamber. Moisture absorption causes wood to swell up and this could lead to cracking of the flute.
- Now, I take the two halves of the Love flute and cut out the exit hole from the slow air chamber and cut the true sound hole. Half of the hole is cut into each half of the flute.
- I sand the barrel and slow air chamber (the inside of the flute) by hand to remove any roughness before sealing the wood.
- I then seal the inside surfaces of the flute with a coat of polyurethane. This must be hand brushed onto the inside of the flute. Once the poly is dry I sand once again to remove any roughness that may have been created by the poly raising the grain of the wood.
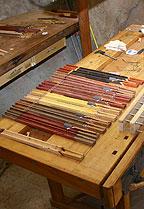 The two halves of the Native American style flute are now ready to be glued together. To glue a flute together I put glue on the edges of both halves of the flute and on the area where the plug will fit. I must spread the glue into an even film with my finger. I wipe off my finger, position the plug inside the Love flute and put the two halves together. I must be careful to assure that the cut out for the SAC and THS line up and that the barrel halves are aligned. The two halves are then inserted into a press and pressure is applied evenly along the entire length of the flute to pull the two pieces of wood closely and evenly together.
- Excess glue always squeezes out of the joint. This glue is swabbed out of the inside of the barrel of the flute with a damp piece of cloth on the end of a long dowel. Excess glue is cleaned out of the slow air chamber with a wet cloth on the end of a stiff piece of wire. The Love flute is set aside to dry.
- When the glue is dry I can take the Native American flute out of the press. Now I take a chisel and scrap any excess glue off the outside of the flute.
- Next, the surfaces of the top and bottom of the flute where the glue joint is must be flattened and squared off. This is done by first cleaning excess dried glue off the bottom side of the flute on the belt sander. Then I run the flute over the jointer to flatten the bottom.
- Now I run the Love flute through the thickness planer to flatten and square the topside.
- At his point I cut a shallow groove into the top of the flute between the slow air chamber and the bore of the flute. This groove is called the flue and it carries air from the SAC to the splitting edge. I do this with a hand held router and a jig to guide the movement of the router bit.
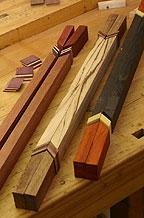 Sometimes there is a small degree of misalignment between the two halves of the flute after gluing. Therefore, I must now clean up the surfaces of the true sound hole and the exit of the slow air chamber with hand files and chisels. This is exacting work because any mistakes will affect the sound generating mechanism of the Native American flute. After this is done, I can put a bird over the nest and test to see what kind of tone the flute will have. This is the first sound I hear from the new Love flute - a happy moment.
If shape, color and fine craftsmanship were all there was to an Ancient Territories Native American style flute then they would be simply 'eye candy' or 'wall hangers'. But, the most important thing about a flute is sound quality. Just as the shape of my flutes has evolved over time and with experience so has the configuration of the sound generating mechanism. The air-focusing channel (flue) is cut into the body of the flute itself not into the bird. This is sometimes called the Eastern woodlands style of Native American flute making. I find that this method allows for a more consistent focusing of the air stream against the fipple (splitting edge) of the flute and thus generates a cleaner, clearer sound. It also allows the Love flute to have greater volume (more breathe pressure) without breaking octave.
At this point the future Love flute looks like a long square block of wood with a hole down the middle and some strange holes on the top. We are now about half way to a finished flute. Now the Love flute must be molded into that distinctive Ancient Territories shape. This shaping transforms a block of wood into a pleasing, comfortable and attractively dimensioned flute. Over the course of making hundreds of Love flutes, a very unique, contemporary and player friendly shape has evolved. I like to think that my Native American style flutes have a design quality not unlike a piece of sculpture. This shape not only pleases the eye but it feels good in your hands and against your mouth.
My Love flutes are not round as are almost all other Native American style flutes. Round flutes are usually turned on a lath. A lath turned flute is fast and easy to make. However, I find the finished appearance to be somewhat boring to the eye. All the Love flutes that I make have a soft, triangular cross section. All Ancient Territories flutes are shaped - you might say sculpted - by hand. The resulting subtle angles and slightly asymmetrical curves create a complex form that attracts and stimulates the eye. The first step in shaping the Love flute is to trim the mouth end to its final length. This trim cut is made at a 90-degree angle on the chop saw.
- Then some of the excess wood is milled off the mouth end of the Love flute with four angled cuts on the table saw. Each cut takes a little wedge shaped piece of wood from each side and from the top and bottom of the flute. These cuts begin the shaping of the mouth end of the Native American style flute.
- Next I begin to create the triangular shape of the body of the flute by cutting a thirty five degree slice off of each half of the bottom of the flute on the table saw. To do this the blade of the table saw is tilted over to a 35-degree angle. These cuts are the beginning of the triangular shape.
- I refine this triangular shape with specially made router bits. The bottom half of each side of the flute is milled on the router table using these router bits. This changes the flat surfaces into a curved and refined shape. I also use a special router bit to curve over the top surface of the Love flute.
- To shape the remaining angular surfaces around the mouth end of the flute I use the large belt sander and start removing material with a 50 grit (very coarse) sanding belt. I must carefully hand shape all of the subtle angles and surfaces of the Native American style flute removing excess wood a little at a time. This is a task that takes a lot of attention and hard work. At this stage I also clean up and refine the cuts that have been made by the router along the barrel of the Love flute.
The head end of the flute where you place your mouth is tapered to an end that is somewhat blunt in comparison to those of most other makers. This enables the Love flute to be held against the lips rather than placed in the mouth. I find this more pleasing and less tiring when playing. The top of the Native American flute where the tone holes are is slightly flattened. This makes for a more comfortable placing of the fingers - I then change sanding belts to further refine and smooth the shape. First, I use 100 grit and then 120 grit belts.
- Now I take a dremel tool and carefully roung over the inside edge of the mouth hole.
- Then, I take the Love flute (which at this point actually looks like an Ancient Territories flute) to the flap sander to soften the shape a little more and take off any remaining sharp edges on the mouth end.
- Now the tuning can begin. The first step in tuning the Love flute is to trim the barrel end of the flute to the required length to sound the fundamental note. Remember the longer the barrel of the Native American flute the lower the sound. This trimming is done on the chop saw with the blade set at a 15-degree angle. The angled end is for appearance. It doesn’t affect the sound. Each Love flute is slightly different, so that I must cut off the end to the approximate length. Then test the tone on an electronic tuner. If the tone is flat it means that the barrel is too long. I must trim off a little more length from the flute and test again. I do this until the fundamental note of the flute is clear and in tune. Sometimes, I must make fine adjustments to the dimensions of the true sound hole and flue while doing this in order to get the tonal quality I am looking for.
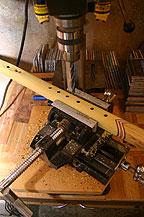 Once the fundamental note of the Love flute is in tune it is time to drill the individual tone holes that make the different notes. This is done on the drill press. To do this the flute is put in a machinists vice that allows movement in two dimensions – side-to-side and end-to-end. This vice holds the flute securely and ensures that the holes are aligned with each other up the barrel of the flute and are the proper distance apart.
- After the six tone holes are drilled I sand out the inside of the bore of the flute with sand paper on a long rotating rod. This is done to remove any hanging pieces of wood that have been left as the drill bit cuts through into the inside of the flute.
- Now, I take the Love flute to the flap sander and carefully round over the outside edges of the tone holes so that they are comfortable on your fingers as they cover the holes. If this isn’t done the hole edges feel sharp under your fingers.
- Then, I take a Dremel tool with a small bit and round over the inside edges of the tone holes where they enter the bore. Now I can begin the tuning of each individual note. This is done by shaving off small amounts of wood from the bottom of the holes to bring the notes into balance with each other. Each flute is tuned and voiced using an electronic tuning device. This results in what some makers call 'concert quality' tuning. A mathematical program devised by Lew Paxton Price and others determines the layout of the tone holes. This positioning of the holes allows the player to use cross fingering and half holing to obtain a diatonic scale.
- With the Dremel tool I round over the inside edge of the bore end of the Love flute. It is not necessary to do this but I like the way it softens the appearance of the end of the flute.
- Back to the belt sander and I begin to round over the outside of the end of the Native American flute. As I have said, this rounding over is to make a pleasing shape on the end of the flute.
- The flap sander is used to further round over and smooth the end of the Love flute.
- It looks like an Ancient Territories flute now. But, the surface of the flute is still rough so more sanding is needed. I use the flap sander, which I now load with 220 grit paper. With this fine grit paper I smooth all the exterior surfaces of the flute again. I must be careful not to touch the edges of the true sound hole on top of the flute or I could ruin the sound.
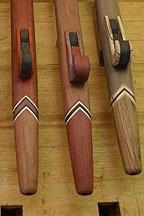 The flute body itself is now pretty much done and ready for finishing. But I still have to make the birds.
- The first step in making a ‘Sound Wave’ bird is to dimension the wood. I rip the wood I need into 1 i/2” wide by 30” long pieces on the table saw.
- I then take these pieces if wood to the band saw to be resawn into 5/16 inch thick slices.
- The band sawed cut leaves a rough surface. So, these pieces are then dimensioned on the thickness sander to produce a smooth surface that will glue tightly.
- I take three of these strips and spread glue in between them, then I put the pieces together and clamp them under pressure.
- When the glue is dry the pieces of wood are removed from the clamps, excess glue is milled off on one side with the belt sander. This squares the block at the same time.
- The opposite glued edge is then trimmed on the table saw so that the piece if wood has a finished width of 1-1 1/2 inches.
- These long lengths of laminated wood are now cut into smaller 3 1/8” long pieces on the chop saw.
- Now, we have a bunch of small pieces of wood 3 1/8” long by 1 1/4” high by 1” wide. They are three layers thick. I take these pieces to the drill press and with a 5/8” drill I drill a hole (which will become the inside curve of the wave) in each piece.
- Then, I cut the chimney into the end of the bird with a dado blade on the table saw. When the finished bird is put on the Love flute this chimney is adjacent to and surrounds the true sound hole on three sides. This configuration keeps the air stream condensed and focused against the splitting edge. It also tends to impart a mellow quality to the tone. By using this method of sound generation the flute is capable of a good range of volume from loud to soft while maintaining purity of tone. The chimney also prevents cross currents of air from distorting the tone of the Love flute.
- Next a cut on the table saw goes from the chimney end of the bird up to the bottom of the hole that I have drilled.
- A quick cut on the band saw removes the waste piece of wood and the two more 45 degree trim cuts rough the out line of the back of the wave form.
- The final shape of the back end and front end of the bird is rounded over to a gentle curve on the belt sander so that we have a nice, flowing, wave like shape.
- The inside curve of the wave form (that we drilled out earlier) is smoothed with sandpaper on a machine called an oscillating spindle sander.
- The sharp edges that are still on the bird are rounded over on the router table with a 3/16” round over bit to soften the shape.
- The bottom of the bird that mates with the flute is flattened and smoothed on the belt sander with 220 grit sand paper.
- All the top surfaces of the bird are softened and rounded on the flap sander.
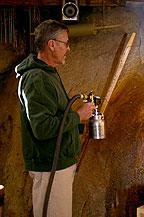
- The Native American style flute and bird are finished inside and out with polyurethane varnish. Polyurethane -when dry- is a non-toxic substance. After much experimentation, I have settled on polyurethane as a protective surface because it has excellent durability and flexibility. Unlike harder epoxy and lacquer finishes it resists chipping and cracking. It is waterproof and does not react with chemicals like alcohol and saliva. Polyurethane is very resistant to the transfer of moisture. This means that the wooden fibers of your flute will not absorb moisture from your breath or the surrounding atmosphere. This is important because moisture absorption can lead to expansion and contraction of the wood and possible cracking of the flute. Polyurethane will also resist cracking, chipping and denting if the flute is inadvertently knocked against something hard. Poly is also good at filtering ultraviolet light rays. This helps to preserve the colors of the wood. I have experimented with so called 'natural' finishes such as Tung oil and other oils. They just don't hold up as well. Also, the slow air chamber of flutes finished with natural oils will tend to absorb moisture, grow mold and acquire an unpleasant odor.
- To apply polyurethane to the exterior surfaces of the Love flute I use a HVLP (high pressure low volume) sprayer. First, the raw wood flute is wiped clean of dust. Then, a single heavy coat of polyurethane is sprayed on. This is allowed to dry for 24 hours.
 Once dry, the flute is sanded lightly on the flap sander with fine 220 grit paper to smooth any raised grain on the surface. The fine sanding scratches also give the second coat a surface to key to.
- Now, I apply a coat of catylitic eoixy to all the inside surfaces of the slow air chamber. I seal the mouth hole with my index finger and pour expoxy through the exit hole of the SAC into the SAC itself. Then I rotate the flute in my hands so that the epoxy coats all the inner surfaces of the SAC. Then, the flute is suspended with the mouth end down to allow excess epoxy to drain out. I do this to make sure that the slow air chamber is completely sealed even along the glue joints. The inside of the SAC is a very moist place and I don’t want any problems with moisture absorption.
- A second coat of polyurethane is now sprayed to the outside of the Love flute. When this is done correctly in a dust free environment you end up with a nice smooth semi gloss surface. The bird is finished in the same way as the flute itself with two coats of poly.
- Applying the polyurethane finish to the Native American flute has changed the dimensions of certain critical areas around the splitting edge and the tone holes. So once a Love flute has found its owner (been sold) I take it back into the shop for its final voicing. First I check the tuning once more and make any adjustments by undercutting the tone holes. Then I carefully round off the underside of the tone holes with a Dremel tool using a double cut oval carbide cutter. Next I smooth all the surfaces of the flue - top, bottom and sides with diamond files and steel wool. I pay particular attention to the shaping of the leading edge of the flue where it enters the True Sound Hole. Then I carefully adjust the splitting edge surfaces so that they are true and smooth and have just the right spacing. This depends on the character of each individual Love flute.With diamond files I smooth all the inside surfaces of the TSH and the exit of the Slow Air Chamber removing any burrs and rough spots. Next with a small piece of sandpaper rolled into a cylinder I sand the inside surface of each tone hole and the lower edge of the tone hole where it enters the bore of the flute. I sand and steel wool the underside of the bird paying particular attention to the leading edge. I put the bird on the flute and test the tonal quality, making adjustments to this leading edge until I get the tonal quality I am listening for - testing, adjusting, testing adjusting. Sometimes I must go back to the splitting edge and make some fine adjustments to bring it into harmony with the air stream being created through the flue. When I am satisfied with the tonal quality I take a small artist’s brush and coat all the surfaces I have just worked on with polyurethane varnish. When the varnish is dry I go over the outside of the flute and if I find any imperfections I smooth them out with steel wool and buff them out on the buffing wheel one last time. Now I tie the bird to the flute with the deerskin band and test the tonal quality of the new Native American style flute one more time. If it passes the test then the flute is ready to go. Sometimes I must go back and repeat a step or two if I am not completely satisfied with the sound I hear. Now the flute is ready to meet its new friend and owner - You.
If you have followed me through all these steps you can appreciate the craftsmanship and attention to the smallest detail that goes into making my Ancient Territories Native American style flutes. I strive to make a quality musical instrument. With your flute you will make beautiful music. Your Love flute will be a proud possession for a lifetime.
